Difference between revisions of "VPN Access"
(→Previous VPN gateway (deperecated)) |
|||
| Line 82: | Line 82: | ||
The old VPN has been decommissioned. | The old VPN has been decommissioned. | ||
| − | If your VPN still contains the remote name 'vpn.th.physik.uni-frankfurt.de', you need to update the configuration. | + | If your VPN configuration still contains the remote name 'vpn.th.physik.uni-frankfurt.de', you need to update the configuration. |
| − | |||
==OpenVPN for Windows 10== | ==OpenVPN for Windows 10== | ||
Revision as of 13:55, 24 March 2020
To get full access to our network from external locations we provide a VPN access based on openvpn. This is free software and part of every Linux distribution. The following guide has been tested with Ubuntu.
If you prefer a graphical configuration, we recommend the Networkmanager based setup:
It is available for Windows and MacOS too.
Contents
Install OpenVPN
It is not part of the default installation, but can easily installed using apt. Enter the following commands:
sudo apt install openvpn
This requires to enter your password to get super user privileges.
Command line configuration
We have setup a new VPN gateway. Please use this configuration and report problems.
This configuration routes all traffic trough ITP. This is useful if you want to download papers, which are restricted to the university network. The second examples only routes the traffic going directly to the ITP trough the VPN and leaves your default gateway untouched. The only difference is the missing 'redirect-gateway' statement [1]
client
dev tun
proto udp
nobind
remote vgw.itp.uni-frankfurt.de
verify-x509-name vgw.itp.uni-frankfurt.de name
remote-cert-tls server
resolv-retry infinite
auth-user-pass
ca private-ca-itp.crt
# Comment this, if you don't want to redirect the default gateway
redirect-gateway def1
Download our CA (Certificate of Authority) [2] and store it in the same place. This file is needed for the verification of the authenticity of the server.
For only accessing internal services and routing your the normal traffic to your normal uplink use the following configuration: [3]
client
dev tun
proto udp
nobind
remote vgw.itp.uni-frankfurt.de
verify-x509-name vgw.itp.uni-frankfurt.de name
remote-cert-tls server
resolv-retry infinite
auth-user-pass
ca private-ca-itp.crt
Start the VPN connection
Open a terminal and change to the path where the vpn config file is stored. Start the connection with
sudo openvpn itp.ovpn
where itp.ovpn is the name of the config file. openvpn needs root access, therefore you must enter your local password for sudo. After this you have to enter your ITP credentials (Username and Password).
If everything went fine the output will look like:
Fri Dec  7 15:03:00 2012 WARNING: Make sure you understand the semantics of --tls-remote before using it (see the man page).
Fri Dec  7 15:03:00 2012 NOTE: OpenVPN 2.1 requires '--script-security 2' or higher to call user-defined scripts or executables
Fri Dec  7 15:03:00 2012 UDPv4 link local: [undef]
Fri Dec  7 15:03:00 2012 UDPv4 link remote: [AF_INET]141.2.246.2:1194
Fri Dec  7 15:03:00 2012 WARNING: this configuration may cache passwords in memory -- use the auth-nocache option to prevent this
Fri Dec  7 15:03:00 2012 [FIAS-ITP_Generic_VPN_Service] Peer Connection Initiated with [AF_INET]141.2.246.2:1194
Fri Dec  7 15:03:02 2012 TUN/TAP device tap0 opened
Fri Dec  7 15:03:02 2012 do_ifconfig, tt->ipv6=0, tt->did_ifconfig_ipv6_setup=0
Fri Dec  7 15:03:02 2012 /sbin/ifconfig tap0 10.63.131.1 netmask 255.255.0.0 mtu 1500 broadcast 10.63.255.255
Fri Dec  7 15:03:02 2012 Initialization Sequence Completed
Termiate the session by pressing Ctrl-C in this terminal.
Previous VPN gateway (deperecated)
The old VPN has been decommissioned.
If your VPN configuration still contains the remote name 'vpn.th.physik.uni-frankfurt.de', you need to update the configuration.
OpenVPN for Windows 10
At the time of writing, you can download OpenVPN on 'https://openvpn.net/community-downloads/'. Download the exe-file for Windows 10 and install OpenVPN. Start 'OpenVPN GUI'. You will get a message that no config file was found. But starting 'OpenVPN GUI' creates a directory to put the config files into.
Next you need to download our CA (Certificate of Authority) [4] and the config file [5].
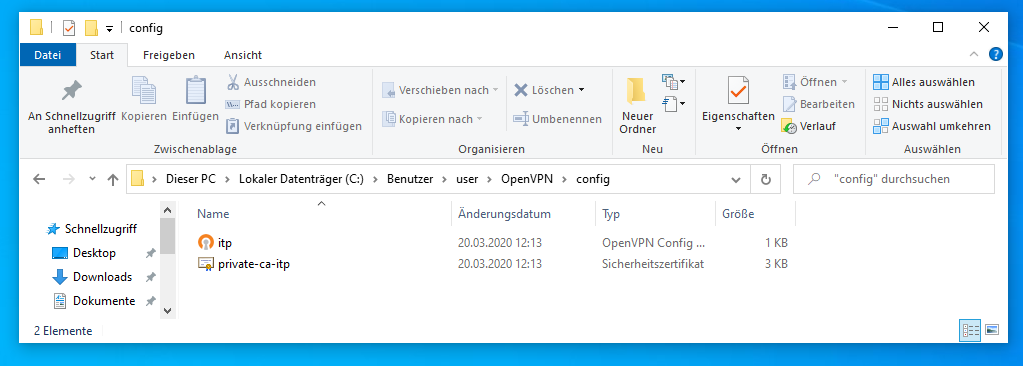
You need to copy/save both files to C:/Users/'yourusername'/OpenVPN/config/, where 'yourusername' is your local username. In the picture below, the directory with the two needed files in it for a german Windows 10 is shown (for the username 'user'). (For both is assumed that 'C' is, as for most Windows systems, your main hard drive.)
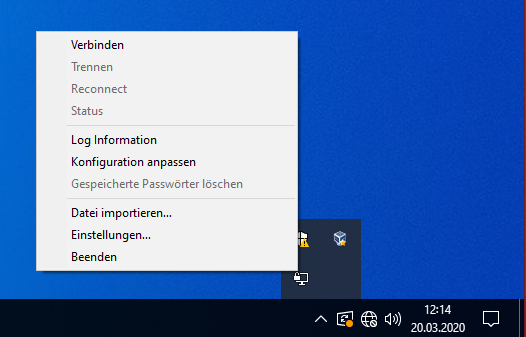
If 'OpenVPN GUI' is started, you can find it in the lower right corner where the minisymbols are. Most likely you need to click on the small arrow first. It is the symbol with the computer screen and the lock symbol. Right click on the symbol and you get a menu where the first option is to connect. Click this option. This menu has less entries if the settings are not found. Then control the previous step.
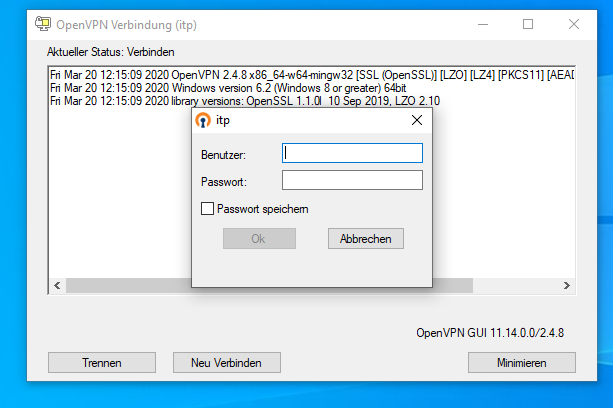
After a few seconds you should get a login screen where you use the credentials of your itp account.
The login takes a few seconds. Your connection was successful if no error window occurs and now the symbol in the lower right is green.
Problems changing the vpn settings in tunnelblick (macOS)
There were problems reported when switching in tunnelblick from the old vpn (vpn.th.physik.uni-frankfurt.de with tap) to the new one (vgw.itp.uni-frankfurt.de with tun). You also have this problem if, after applying the new configuration file itp.ovpn, the vpn does not work and the output contains a line containing 'vpn.th.physik.uni-frankfurt.de'. Search the output for a line beginning with '--config' and ending on '.ovpn'. This line specifies which configuration file (.ovpn) is used to establish the vpn connection and where it is located. Edit this file to have the same content as the itp.ovpn [6] (most likely the lines 2, 5 and 6 need to be edited).


