Difference between revisions of "SAMBA Service"
(Created page with "Test") |
|||
| Line 1: | Line 1: | ||
| − | + | We've set up a whole new Samba service for you which is fully integrated into LDAP service which runs more stable. This guide is for Windows 7/10 users only; Ubuntu users don't have to change anything. | |
| + | === Windows 7 === | ||
| + | # Open Computer by clicking the Start button and then clicking "Computer". | ||
| + | # Click "Map network drive". | ||
| + | [[File:Win7_computer.PNG|thumb | ||
| + | |Map network drive in Computer (Windows 7)]] | ||
| + | # In the "Drive" list, click a drive letter. You can choose any available letter. | ||
| + | # In the "Folder" box, type <code>\\samba-itp\USERNAME</code> while USERNAME stands for your own login name. To connect every time you log on to your computer, select the "Reconnect at logon" check box. | ||
| + | # Click "Finish". You will be ask to type in your login name and passwort for verification. | ||
| + | # Click "OK". Your computer is now connected, or mapped, to the network drive. | ||
| + | |||
| + | === Windows 10 === | ||
| + | # Open File Explorer and on the left select "This PC". | ||
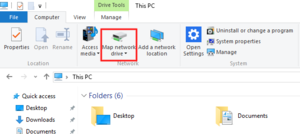
| + | # Click the "Map network drive" button in the ribbon menu at the top. | ||
| + | [[File:Win10_this_pc.PNG|thumb | ||
| + | |Map network drive in This PC (Windows 10)]] | ||
| + | # Then select "Map network drive." This is under the "Computer" tab, which should open automatically when you go to This PC, as above. | ||
| + | # In the "Drive" list, click a drive letter. You can choose any available letter. | ||
| + | # In the "Folder" box, type <code>\\samba-itp\USERNAME</code> while USERNAME stands for your own login name. To connect every time you log on to your computer, select the "Reconnect at sign-in" check box. | ||
| + | # Click "Finish". You will be ask to type in your login name and passwort for verification. | ||
| + | # Click "OK". Your computer is now connected, or mapped, to the network drive. | ||
| + | |||
| + | == Connect to SAMBA printers == | ||
| + | |||
| + | Connecting to printers work as above. | ||
| + | |||
| + | === Windows 7 === | ||
| + | # Open "Devices and Printers" by clicking the Start button and then, on the Start menu, clicking "Devices and Printers". | ||
| + | # Click Add a printer. | ||
| + | # In the "Add Printer" wizard, click "Add a network, wireless or Bluetooth printer". | ||
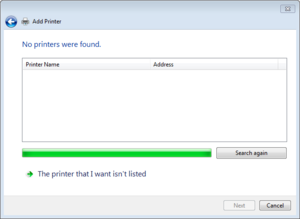
| + | # Windows will search for available printers, but you want to click "The printer that I want isn't listed". | ||
| + | [[File:printer_isnt_listed.PNG|thumb | ||
| + | |The printer that I want isn't listed]] | ||
| + | # Select "Select a shared printer by name" and type <code>\\samba-itp\PRINTERNAME</code> while PRINTERNAME stands for the name of the printer e.g. "psKyo2". | ||
| + | # If prompted, install the printer driver on your computer by clicking "Install driver". | ||
| + | # Complete the additional steps in the wizard, and then click "Finish". | ||
| + | |||
| + | === Windows 10 === | ||
| + | Coming Soon! | ||
Revision as of 10:03, 26 January 2016
We've set up a whole new Samba service for you which is fully integrated into LDAP service which runs more stable. This guide is for Windows 7/10 users only; Ubuntu users don't have to change anything.
Windows 7
- Open Computer by clicking the Start button and then clicking "Computer".
- Click "Map network drive".
- In the "Drive" list, click a drive letter. You can choose any available letter.
- In the "Folder" box, type
\\samba-itp\USERNAMEwhile USERNAME stands for your own login name. To connect every time you log on to your computer, select the "Reconnect at logon" check box. - Click "Finish". You will be ask to type in your login name and passwort for verification.
- Click "OK". Your computer is now connected, or mapped, to the network drive.
Windows 10
- Open File Explorer and on the left select "This PC".
- Click the "Map network drive" button in the ribbon menu at the top.
- Then select "Map network drive." This is under the "Computer" tab, which should open automatically when you go to This PC, as above.
- In the "Drive" list, click a drive letter. You can choose any available letter.
- In the "Folder" box, type
\\samba-itp\USERNAMEwhile USERNAME stands for your own login name. To connect every time you log on to your computer, select the "Reconnect at sign-in" check box. - Click "Finish". You will be ask to type in your login name and passwort for verification.
- Click "OK". Your computer is now connected, or mapped, to the network drive.
Connect to SAMBA printers
Connecting to printers work as above.
Windows 7
- Open "Devices and Printers" by clicking the Start button and then, on the Start menu, clicking "Devices and Printers".
- Click Add a printer.
- In the "Add Printer" wizard, click "Add a network, wireless or Bluetooth printer".
- Windows will search for available printers, but you want to click "The printer that I want isn't listed".
- Select "Select a shared printer by name" and type
\\samba-itp\PRINTERNAMEwhile PRINTERNAME stands for the name of the printer e.g. "psKyo2". - If prompted, install the printer driver on your computer by clicking "Install driver".
- Complete the additional steps in the wizard, and then click "Finish".
Windows 10
Coming Soon!


