Difference between revisions of "VPN with Networkmanager"
(→Getting Started) |
(→Getting Started) |
||
| Line 18: | Line 18: | ||
== Getting Started == | == Getting Started == | ||
| − | <br>[[File:step_01.png | thumb | x50 | Ubuntu 14.04]] | + | <br>[[File:step_01.png|thumb|x50|Ubuntu 14.04]] |
To get VPN access you must set up a new VPN connection first. Click on the two arrow symbol (or the WiFi symbol - depending on which connection you are currently using) in the top right corner. | To get VPN access you must set up a new VPN connection first. Click on the two arrow symbol (or the WiFi symbol - depending on which connection you are currently using) in the top right corner. | ||
| Line 27: | Line 27: | ||
: Choose <code>OpenVPN</code> and click on <code>Create...</code>. | : Choose <code>OpenVPN</code> and click on <code>Create...</code>. | ||
Now you have to edit and configure your connection. Choose any connection name e.g. itp_openvpn. <br> | Now you have to edit and configure your connection. Choose any connection name e.g. itp_openvpn. <br> | ||
| − | |||
| − | |||
For the '''Gateway''' type: | For the '''Gateway''' type: | ||
| Line 34: | Line 32: | ||
Under '''Authentication''' select <code>Password</code> as authentication type. Enter your user name and password and choose the CA Certificate 'localca.full.pem'. It can be downloaded [http://th.physik.uni-frankfurt.de/~thw/vpn/localca.full.pem here]. | Under '''Authentication''' select <code>Password</code> as authentication type. Enter your user name and password and choose the CA Certificate 'localca.full.pem'. It can be downloaded [http://th.physik.uni-frankfurt.de/~thw/vpn/localca.full.pem here]. | ||
| − | <br>[[File:step_04.png | thumb | x50 | VPN Settings]] | + | <br>[[File:step_04.png|thumb|left|x50|VPN Settings]] |
Save your changes. | Save your changes. | ||
Revision as of 08:35, 30 April 2015
This article shows you how to log into our VPN network without using the terminal. This method is by far more convenient and you also may find this helpful, if you are not very familiar with command lines. We will use a VPN Plugin called network-manager.
Installation
Open up a terminal of your choice (Ctrl + T) and install OpenVPN Network Manager by tying the following line:
sudo apt-get install network-manager-openvpn-gnome
Please enter your password to confirm the installation.
After the successful installation NetworkManager must be restartet:
sudo service network-manager restart
Again, confirm with your password if necessary.
Getting Started
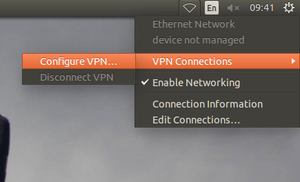
To get VPN access you must set up a new VPN connection first. Click on the two arrow symbol (or the WiFi symbol - depending on which connection you are currently using) in the top right corner.
- Now choose
VPN Connections -> Configure VPN....
A new window will open up.
- Click on
Addto add a new connection.
You will be asked for the connection type.
- Choose
OpenVPNand click onCreate....
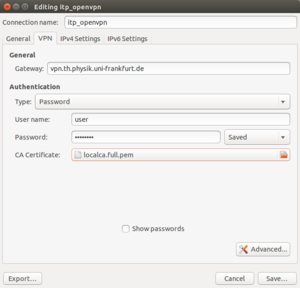
Now you have to edit and configure your connection. Choose any connection name e.g. itp_openvpn.
For the Gateway type:
vpn.th.physik.uni-frankfurt.de
Under Authentication select Password as authentication type. Enter your user name and password and choose the CA Certificate 'localca.full.pem'. It can be downloaded here.
Save your changes.
Your new VPN connection will be listet in Network Connections.
Using a VPN Connection
To access a VPN network just click on the arrow or WiFi symbol on the top right corner. Your configured connection should be found under VPN Connections.

